Timings: Aurelia Cli

This post is related to my earlier posting, Timings: Angular Cli, where I time how long it takes to install Angular Cli and create a base solution using the Cli. Here I’ll be running the same tests, as far as possible, with the Aurelia Cli, which can be found over on github

First of all we need to get the CLI:
npm install –g aurelia-cli

At the time of running this test the version of Aurelia CLI is 0.16.1

Install time: 1 minute

Next up is the creation of the base solution:
au new

Aurelia asks a number of questions to configure the solution, a nice touch that both the Angular and the Dotnet CLI could learn from.

Name the app: timings-test
Default setup or customize: selected option 2 – use TypeScript
Create this project? selected option 1 – Yes (Default)
Install project dependencies? selected option 1 – Yes (Default)

Generation time: 3 minutes – I’d like to see this down to around 2 minutes, which (for me) would be far more acceptable; however, this is 2.5 minutes faster than Angular, so not too bad

So how big is the folder?

It’s a little under 16 thousand files (15,937 actually), totalling 124 MB (142 on disk)

That is still a lot of files, and I hope that as the CLI matures and is fine tuned that the time to be up and running is reduced a little and the number of files it has to install is reduced.

In my Angular CLI post I highlighted a could of points; noting that this is still beta software and the use of so many node modules in a given project needs a bit of a shake up. Those points still hold true.

Just as a passing shot: running dotnet new –t web took 1.5 minutes from fresh install. After warm up it took 7 seconds! In the pursuit of fairness I then ran dotnet restore which took 1 minute. And yes before anyone calls foul I do realise that this is not comparing like for like, I know that, however I wanted to point out that a lot can be done far faster than the CLIs being tested and with far less total files. Oh, this solution is 75 files, totalling 673 KB (768 on disk).

That’s about it for now. Thanks for reading and see you next time.

Timing: Aurelia Cli (delayed)

I was hoping to put a post together a post that showed the timings of using the Aurelia CLI (from here) Unfortunately I’m as busy as ever and haven’t had the chance to get round to it so far. In the time since my last post there have been updates to both the Aurelia CLI and the Angular CLI, therefor I think it only fair to run the timings tests on the latest versions of each.

I’ll dedicate a bit of time to this over the next few days, updating my existing post and providing a matching one for Aurelia.

That’s about it for now. Thanks for reading and see you next time.

Timings: Angular Cli

Update 22 July 2016 – Version 1.0.0-beta.10

I have been using beta’s and pre-beta’s of a number of client and server side technologies over the past couple of years. I have been enjoying all of them with the exception of one thing, time to get up and running with the client side frameworks.

Rather then me telling you of my experiences and the struggles of working with pre-release software, I’ll take you through the entire process of going from zero to a base project on Angular 2 using the new(ish) Angular CLI, which can be found over on github

I already had node installed so not exactly zero, close enough though
image

First off we need to get the CLI
image
Note: at the time of running this test the version of the Angular CLI was 1.0.0-beta.8

Install time: 5 minutes – not too bad, but not great. At least I don’t have to do this more than once.
Install time: 3 minutes; this is much more acceptable

Next up is the creation of the base solution that I can then start working with
image

Generation time: 4.5 minutes – for me this is far, far too long. I need to be up and running much quicker than this. So why so long?
Generation time: 5.5 minutes – a whole minute longer!

I revisited this a few times, allowing the cache to “warm up”, unfortunately no change. Creating a new project was always in the 4.5 – 5 minute range. I have to guess that the CLI is not currently utilising any caching; if it were I would expect to have seen all additional runs of ng new to be faster than that initial run. It’s still in beta so that’s ok for now.

So why did it take so long to create the new project? Lets take a look at the folder the new project was created in to try and figure this out.
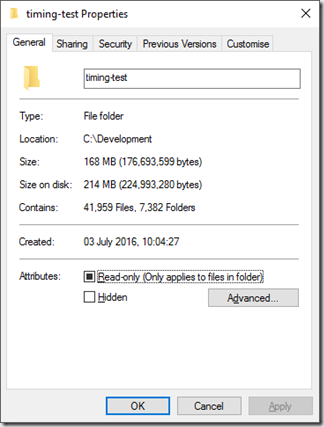
image

Just in case you can’t read that. Running ng new creates a starter project with a little under 43 thousand files, just to be clear, that’s 43,000 files put on disk, totalling a whopping 168 MB (214 on disk) – wow.
The starter project now contains 41.5 thousand files, which isn’t much better that it was previously, only now it is a total of 194MB (239 on disk) – wow, wow, WOW! What is going on?

Is it just me or does this seem just a little crazy? Do we seriously need all of those files? From my point of view, and a very simplistic answer, is “No, of course we don’t.”

Couple of things to point out here:

  1. The Angular CLI is still in beta, so I am hoping that the overall performance of creating a new project will improve as the project matures and gets closer to RTM. For me project creation has got to be down to a couple of minutes max!
  2. Is the use of NPM all that it’s cracked up to be?
    I use node from time to time and am finding the module system to be getting out of hand. Installing one module results in dozens, if not hundreds, of other modules being dragged in. Some of these modules are single functions that don’t do anything more than to allow developers to be really lazy. Just take a look the the left-pad mess
    The number of files on disk to generate a very simple Angular 2 app is ridiculous. 43 thousand files for what is not much more than “Hello, world” is nonsense. An alternative needs to be found to this. I build lots of projects, real, prototypes, tutorial, etc. and having each one of those take so long to build and use up that much disk space is criminal. Bytes matter people and we need to look back to those dark ages when we had to justify every single byte we sent over the wire. If you are a developer that is building node modules please think carefully about adding dependencies on other modules that themselves have dozens of dependencies. Honestly, sometimes it is better for the community as a whole if you just implement your own left-pad.

In my next post I’ll take a look at the time it takes to go from zero to getting a base project for Aurelia.

That’s about it for now. Thanks for reading and see you next time.

Unit Tests – Just do them!

They can be seen as a pain point.  Unit tests should be fairly simple to implement, but often aren’t as the code under test just isn’t written to be testable.

I’ve spent years trying to add unit tests to legacy code, and it was painful to the point of giving up every time.  I did what I could but it always came down to having to refactor so much code to make it testable that I would run out of time and patience.

I’m currently working on code that is new and has hundreds of validations methods.  There is no way I could expect anyone to test all of this using any kind of manual testing, it would take weeks, if not months of effort.  The solution was blindingly obvious, add unit tests.

I’ve still got some way to go, it takes time to write tests, and a little thought to ensure they are useful.  If you’re going to write tests make sure you are testing something that is worth testing.

The stance I’ve taken is to write half a dozen to a dozen tests then run them and check the output.  It’s working for me very well and I’m happy with the 70 or so tests I’ve been able to write so far.

Two interesting things have come out of writing these tests so far:

  1. Some of the validation routines were doing too much, i.e. they were testing 2 or more things rather than just 1.  I’ve refactored these as I go and was able to use my tests to validate I haven’t messed anything up.
  2. I found 2 bugs!  It would have taken months for these bugs to have been uncovered and by then I would have been so far away from the code it would have taken me some time to track down and fix.  As it was it took me no more than a couple of minutes to fix each.

My code coverage is still pretty low, currently sub 10%, however I’d expect to expand on this over the coming days.

If you’re not writing unit test then make a start.  Start with 1 test and add to it over time.  Build up your test coverage as and when you can.  Target a reasonable test coverage, perhaps start with 10%, then 25% then maybe 75%.  Don’t target 100% as this is as close to impossible as to not make sense.

If you work as part of a team then talk to them and encourage them to write tests, figure out how to make code testable, how to write testable code and how to write tests.  Don’t forget unit tests are code, so you need to ensure you have coding guidelines in place – you may find that your current code guidelines don’t quite work with tests, just amend to fit, have code guidelines and test code guidelines if you need to.

Whatever you do, make sure you are always making concious decisions and review those decisions as and when required.

That’s about it for now.  Thanks for reading and see you next time.

Keyboard Short Cut of the Week – 3

I’m going out on a limb here, all of you know that, within Visual Studio, pressing F9 will toggle a breakpoint.  If you didn’t know that then you get 2 short cuts this week.

A related short cut that not every one knows or uses, is Ctrl+Shift+F9.  This allows you to very quickly remove all breakpoints you may have set.  You get prompted to confirm the action, with ‘Yes’ being the default action, so the full set is Ctrl+Shift+F9 followed by Enter to delete all breakpoints.

It is possible to disable all breakpoints, although there is no default short cut key defined for this.  If you use breakpoints a lot then I would highly recommend that you set a short cut for this as it will save you lots of time.

That’s about it for now.  Thanks for reading and see you next time.
WCF Performance Testing

Just a quick note to anyone that may be performance testing a WCF service from within Visual Studio – Don’t!

Visual Studio adds a fair bit of overhead when running anything.  If you need to performance test a WCF service ensure that you build it in Release mode and then deploy it somewhere.

I spent some time over the last few days trying to figure out why a simple service call was taking so long. It was just accepting a string, validating it as a number and then outputting the value when value % 500 == 0.  It was taking over a minute to run on a loop counting from 1 to 30,000 – far too long.

After all kinds of experimentation I finally built it in Release mode, both the service and client that was calling it, and retested the performance.  From over a minute to about 3 seconds!

Lesson learnt – move along

Keyboard Short Cut of the Week – 2

This week a simple one that is used by most people most days, however is not used to it’s full potential.

Ctrl+x – Meaning: While holding down the Ctrl key press x.

Simple, it’s cut, everyone know that, right?  Correct, the vast majority of people will know that this is cut.  What a lot of folk still don’t know is what will this cut.

Select a word and Ctrl+x will cut the word, select a sentence or paragraph and it will cut those too.  What about if nothing is selected?

It will cut the line the cursor is currently on.  So rather than going to the end of a line and using the backspace key to delete the line, which is what I often see, just ensure the cursor is on the line to be removed and Ctrl+x – BAM! Line gone.

CAUTION: This is a cut action, i.e. it removes the content and places it on your clipboard.  If you are refactoring and you use this just be aware that you may have something in your clipboard that you are moving around and using Ctrl+x will replace what’s in your clipboard with what you have just cut.  Speaking from experience, I’ve done this many times and still do it from time to time. I’ve got myself in the habit of when moving stuff around to paste the code in transit prior to anything else.

That’s about it for now.  Thanks for reading and see you next time.

Keyboard Short Cut of the Week – 1

There are lot’s of keyboard short cuts in Visual Studio that I use every day and it still surprises me how many of my peers don’t know they exist.  So I thought I would start providing a few for reference.

As this is my first post on the subject I’ll give 2 short cuts this time round.

Ctrl+k, c – Meaning: While holding down the Ctrl key press K followed by C.  This will add comment markers to the current line or currently selected block of text.  The cool thing about this is that it works in most code types, for example C#, VB.Net, JavaScript, Razor and HTML.

Ctrl+k, u – Meaning: While holding down the Ctrl key press K followed by U.  This will remove comment markers from the current line or currently selected block of text.

That’s about it for now. Thanks for reading and see you next time.

Self Host Duplex WCF Service with Discovery

To begin with my service testing I need to create a class library to hold the interfaces that will be implemented by the WCF service. The first is the interface that defines the functionality the service will implement, the second is the callback interface that is required for the duplex nature of the service being implemented.

using System.ServiceModel;

namespace SharedInterfaces
{
    [ServiceContract(CallbackContract = typeof(IWCFTrainingCallback))]
    public interface IWCFTraining
    {
        [OperationContract]
        string GetName();

        [OperationContract(IsOneWay = true)]
        void GetStatus();
    }

    public interface IWCFTrainingCallback
    {
        [OperationContract]
        void Status(string statusMessage);
    }
}

The service will be hosted in a console application. Once the console application has been created there are two things that need to be performed.
First creating a class to hold the service implementation.

[ServiceBehavior(ConcurrencyMode = ConcurrencyMode.Reentrant)]
class WCFTrainingService : IWCFTraining
{
    string IWCFTraining.GetName()
    {
        // For testing just return a string
        return "Jester98x";
    }

    void IWCFTraining.GetStatus()
    {
        // We're only testing so no need to do much
        // more than just loop round for a while and
        // return a value back to the callback
        for (var i = 0; i < 100; i++)
        {
            System.Threading.Thread.Sleep(50);
            OperationContext.Current
                .GetCallbackChannel<IWCFTrainingCallback>()
                .Status(i.ToString() + "% complete");
        }
    }
}

Then we get round to creating the self-hosted part with the following:

class Program
{
    static void Main(string[] args)
    {
        Console.Title = "WCF Testing Host";

        Uri baseAddress = new Uri("http://localhost:9080");
        Uri tcpBase = new Uri("net.tcp://localhost:9081");
        using (var selfHost = new ServiceHost(
            typeof(WCFTrainingService), baseAddress, tcpBase))
        {
            selfHost.AddServiceEndpoint(new UdpDiscoveryEndpoint());
            var sdb = new ServiceDiscoveryBehavior();
            selfHost.Description.Behaviors.Add(sdb);

            selfHost.AddServiceEndpoint(
                typeof(IWCFTraining), 
                new NetHttpBinding(), 
                "HttpTrainingService");

            var net = new NetTcpBinding();

            selfHost.AddServiceEndpoint(
                typeof(IWCFTraining), 
                new NetTcpBinding(), 
                "TcpTrainingService");

            var smb = new ServiceMetadataBehavior();
            smb.HttpGetEnabled = true;
            selfHost.Description.Behaviors.Add(smb);

            selfHost.Open();
            Console.WriteLine("Service has started");
            Console.ReadLine();
            selfHost.Close();
        }
    }
}

At this point we have a service hosted within a console application. Doesn’t do a great deal, that’s fine as we’re just showing that discovery is working and that we can communicate in a full duplex fashion.
So the next thing that is required is a client to assist with the testing of the service. One thing that I want to ensure is that it is proxy free, this is why the interfaces are in a shared project, i.e. not confined to the service.
The client is another console application.

class Program
{
    // Simple list to store the discovered endpoints
    static List<EndpointAddress> found = new List<EndpointAddress>();

    static void Main(string[] args)
    {
        Console.Write("Wait for proxy and press enter:");
        Console.ReadLine();
        FindWCFService();
        Console.ReadLine();
    }

    private static void FindWCFService()
    {
        Console.WriteLine("Starting Discovery Process");
        var dc = new DiscoveryClient(new UdpDiscoveryEndpoint());
        var fc = new FindCriteria(typeof(IWCFTraining));

        // Only search for 5 seconds
        fc.Duration = TimeSpan.FromSeconds(5);
        
        // Set up some event handlers
        dc.FindProgressChanged += Dc_FindProgressChanged;
        dc.FindCompleted += Dc_FindCompleted;
    
        // Start the discovery process
        dc.FindAsync(fc);
        dc.Close();
    }

    private static void Dc_FindCompleted(object sender, FindCompletedEventArgs e)
    {
        if (found != null && found.Count > 0)
        {
            // Define the object that will handle the callback
            // from the service
            var ptest = new ProcessTest();

            // Get an instance context from the object
            var ic = new InstanceContext(ptest);
            var net = new NetTcpBinding();

            // Create a channel to call the service methods
            var duplexProxy = new DuplexChannelFactory<IWCFTraining>(ic, net, found[1]);
            var dProxy = duplexProxy.CreateChannel();
            Console.WriteLine("Calling status on proxy");

            // Call the get status method, which will act as our
            // long running process and call back test bed
            dProxy.GetStatus();

            // Call a method that returns immediately
            Console.WriteLine(dProxy.GetName());
        }
    }

    private static void Dc_FindProgressChanged(object sender, FindProgressChangedEventArgs e)
    {
        // When an endpoint is found add it to our found list
        found.Add(e.EndpointDiscoveryMetadata.Address);
    }
}

[CallbackBehavior(UseSynchronizationContext = false, IncludeExceptionDetailInFaults = true)]
public class ProcessTest : IWCFTrainingCallback
{
    public void Status(string statusMessage)
    {
        // Do something with the callback
        Console.WriteLine(statusMessage);
    }
}

That’s about it for now. Thanks for reading and see you next time.